Reproducing the Seax of Beagnoth
Making the Seax of Beagnoth
This is the iconic Langseax of the Viking age and is housed at the British Museum, London. With the blade forging by Owen Bush and the inlay, scabbard and grip work by Tod of Tods Workshop.


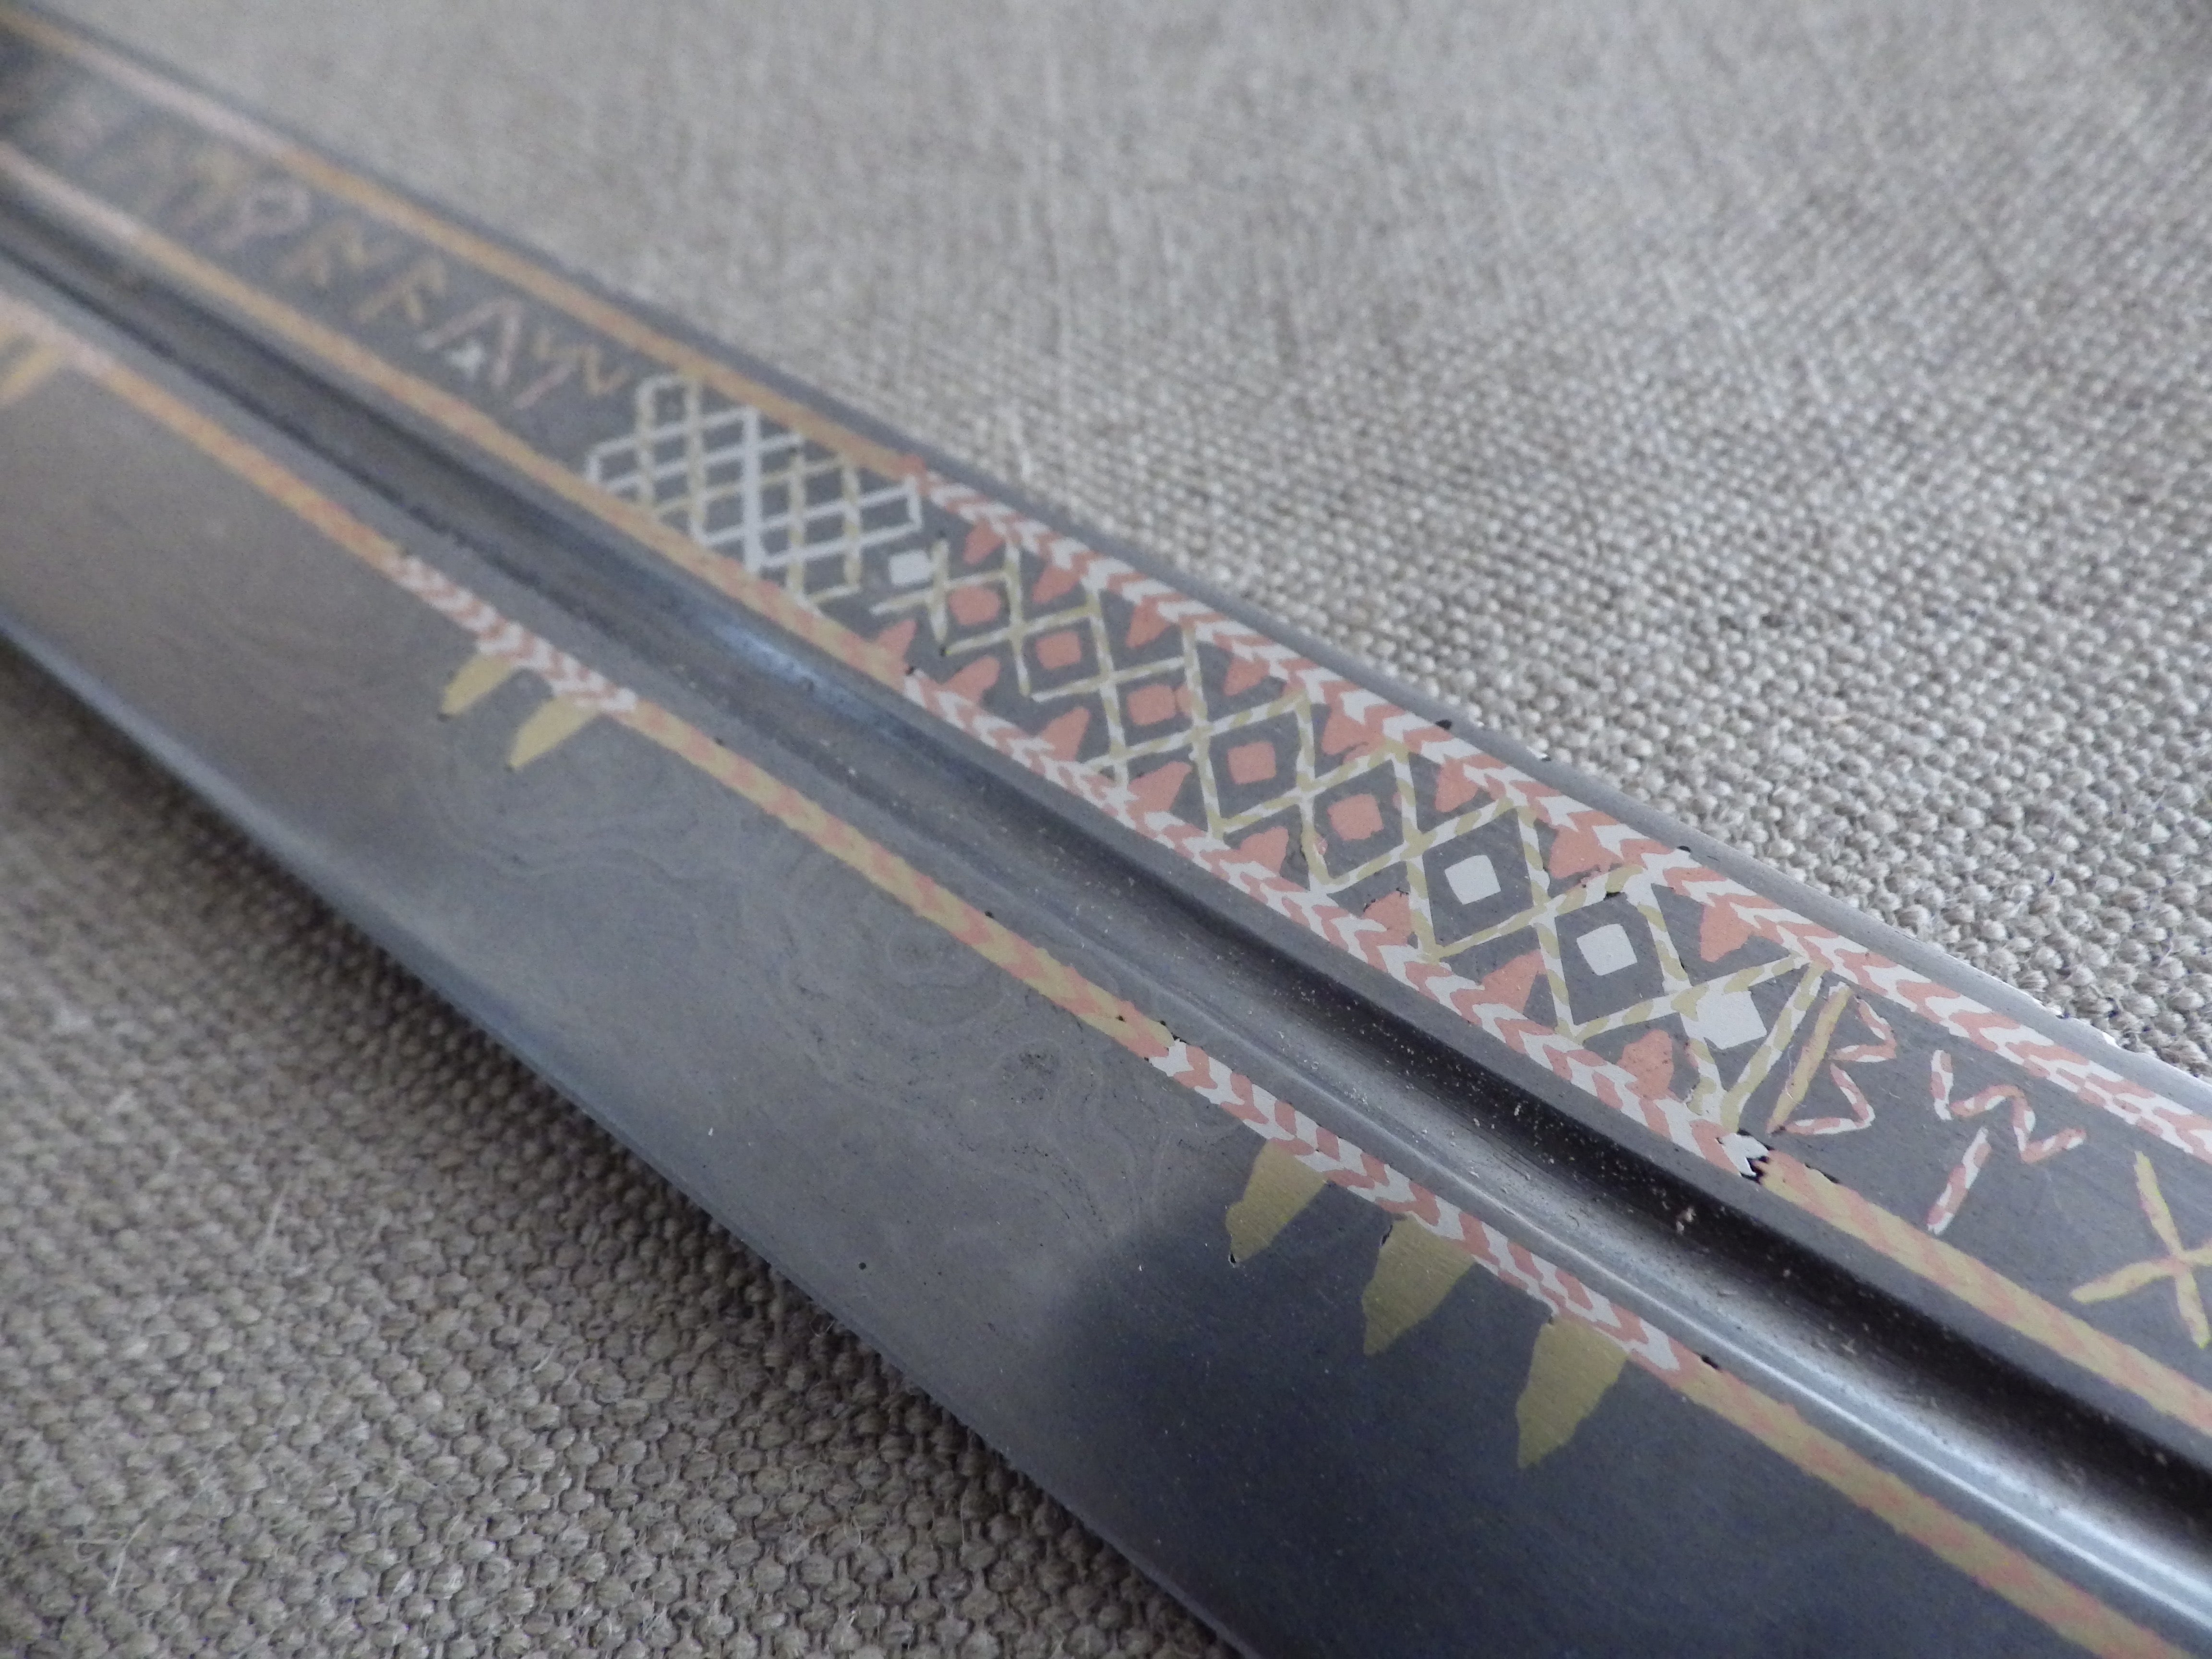
The amazingly well preserved blade is of a 10thC Langseax with a 55cm/22" blade of the broken back type and is long and beautifully elegant. What really makes it stand out is the very elaborate Futhorc alphabet inlaid in wire on one side and the name Beagnoth on the other. There is considerable further wire inlay in geometric patterns on both sides of the blade as well as the spine.
The origin of the blade is most probably Kent as the only two renderings of the name in manuscripts are from Kent and the alphabet used, also best fits that from Southern England. There are two very surprising aspects to the blade; firstly the Futhorc alphabet is quite literally the Saxon equivalent of ABCDEFG etc. Secondly the use of the different inlay material is utterly random, with no discernable pattern or reason, so that even parts of the same letter have different combinations of twisted wire.

Original blade with inlay
We were also able to measure the section of the blade, which is an apple seed grind from edge to the fuller and again back toward the spine, so that the thickest section of the blade is right by the fuller, not at the edge as you may expect.
What is also interesting is that there is a partial break near the 'broken' part of the back that has caused the tip of the blade to rotate around. This means that the very distinctive and elegant form of the blade is in fact not what it would have looked like in life. We opted to shape the blade more in line with how it would have originally been.
 Broken tip
The blade construction and make up is bloomery iron and bloomery steel, from 3 separate smelts. The steel is multiply folded magnetite bloom, circa 25,000 layers, and is a high carbon steel. Edge and body is a sandwich of high carbon bloomery steel (25,000 layer) with a mix of bloomery iron from a hematite smelt and bloomery iron from a siderite/magnetite smelt on the outside of the sandwich. The back edge is laid on its side and is again a mix of the iron and steel layers. Materials are derived from Wealden siderite from Kent, Swedish magnetite and hematite. The blade was then oil hardened in high temperature oil, making for a tough and moderately hard blade, but not as remotely hard as modern steels.
We don't know the method of construction of the original piece, but Owen has followed an established method for knives of this period.
 Blade before any work
Originally the blade came to me etched up and looking lovely, but it still needed the fuller, so I cleaned it back for clarity, marked up the fuller and ground it in. Losing the etch doesn't matter at all, as the wire inlay is a messy process and it has to be reground and polished again after this.
The next step has begun now and that is to mark up the blade to get it ready for the inlay. I have covered the blade with masking tape and have drawn on one face and the spine where the inlay will go and to get all of my inlay kit ready.
 Inlay kit
What is already becoming evident is the slightly erratic nature of the inlay. There are 9 groups of lines on the spine, 8 of 2 lines and 1 of 3 lines and the seven groups of triangle dags under the fuller, 6 have 3 dags and 1 has 4 dags. This apparently haphazard layout will be a continuing theme...
 Marked up blade
The haphazard nature of the wire infills is curious. When Owen and I handled the piece, it was a surprise for us both. I had obviously looked at the pictures, but just assumed that the inlay would be of one metal (or pair of metals) or failing that to have some apparent reason for using different metals. However it was simply not like this at all. Some areas like the longitudinal wire pairs under and above the fuller are made in shorter sections of silver and copper and copper and brass that has some reason in that they reasonably alternate. Other areas though really do seem to have no sense, so that the runes for example may have two or three different wire combinations in one rune and the next may be entirely of one combination. We were advised that this characteristic was evidence of post manufacture repairs and this is of course both possible and is a point for debate, however both Owen and I dismissed this as a possibility in our opinions.

Wire is set in
In its simplest manifestation, wire inlay is a relatively straightforward principle, but is also time consuming. A groove is chiseled into the metal by running along a drawn line with a very small chisel punching downward, this pushes the metal out sideways and a little upward, so that a lip is created at the top of the V. A small chisel is then tapped along each face of the V to create a small undercut. A round wire is annealed and placed onto the groove and tapped in with a small pin hammer. This pushes the wire into the groove and into the undercut. A rounded punch is then passed over the groove/wire and this drives the wire deeper into the V and also closes the lip partially over the wire. The process mechanically locks the wire in place, there is no soldering, welding or gluing.
 Cut grooves
If you want a twisted wire then simply follow the same process and the hammering will perfectly squash the wire twists together so that it fills the groove with no gaps (mostly).
 Wire hammered into grooves
 Wire hammered in and cleaned back
If you want a small plane like the triangles here, then a punch is used to punch the form directly down and then the faces undercut with a chisel and a small bead of annealed metal placed on the form and tapped down as before.

Geometric forms punched in

All hammered down
The punches are small and quick to make and so if you need a new tool for the job, then it is usually easier to make a new one than struggle on with what you have. Shape a piece of tool steel, get it red hot, quench and give it a very light temper to keep it really hard. If it breaks, reshape it and temper it a little softer next time.
Once the inlay is locked in, it will still be proud of the main surface and so this must be ground off and the piece repolished.
 Wires hammered in but still proud
So, back to the work itself….
The pictures below show a mild steel test piece and the various steps for the principle inlays on this blade and also show the surface disruption caused by the punching and the undercutting. For an idea of scale, the bar is 25mm/1" wide and the wire is 0.5mm diameter. The chisel shown in these pictures was used for running the grooves in, but was in fact too wide for undercutting the Vs so I made a smaller one - its fiddly and slow work.
 Test piece
I started on the non-rune side of the blade with the cross hatching near the tip and I went for a silver and brass wire combination. The grooves were hammered in using a small cold chisel with a 2mm edge and then undercut with the same chisel.
The two long grooves were then cut in and the bottom faced before undercutting the edges and then I went on to cut the main crosshatching. I laid in the cross wires and then the long wires and then went on to fit the triangles and squares.
I was pleased with the progress and the wires went in well and seemed secure at this stage. However the triangles for the small copper inserts were hammered in next, which upset the twin wires as you can see. So I think we can assume that I got the order wrong. Damn.
 Messed up inlay
The copper triangles have been laid in and I will now pick out the twin wires, clean up the trough and lay new ones back in, but before doing that I will lay in the silver squares in the centre of the cross hatching. Everything is very solid now, but nevertheless it is soul destroying having to pick out the last 2 days work
I started by laying in the copper into the triangles and then punching the squares for the silver. Both of these required punches to be made and these had to be made right and cold hammering into metal onto an anvil is punishing for a small punch, though thankfully the wrought iron of the blade is soft so that helps a lot.
Once the squares were in, I made silver spheres out of pure silver. This is easily done by clipping a small amount of silver off and putting it on a brick and hitting it with a torch. It will suddenly reticulate and contract into a sphere, note that the silver is still bright, showing it is pure and not alloyed.
 Reticulated silver spheres
These are then placed into the squares, which have of course been undercut, and hammered home. Once these were all in, I unpicked all the previous wire work, made sure all the undercuts were still there and then laid all the wires in again. In retrospect I should have assumed that the major disturbance created by the shaped punches would do this, but I didn't. The inlay to the second side, the rune side, has all gone in very well,
The blade will naturally age and tarnish and this will show up its composition, but I wanted to speed this a little and so I wiped it over with citric acid to subtly show the structure.
As the inlay is effectively porous, any acids/chemicals put on the blade will go between the inlay and the blade and be very hard to wash away, so before any chemicals touch the blade, the whole blade is heated slightly and wax melted onto all the surfaces so that it impregnates any voids and seals them off. The blade can then be etched or coloured in the normal way without any chemicals getting stuck deep inside.
 Finished inlay
The grip will be comprised of a horn ferrule and spalted box wood with some silver inlay. Spalting is when the cut wood gets a fungal infection of the cell body, not the wall and so colour gets into the wood without affecting the structural integrity of the wood. With box wood it is possible to get colours from golden brown through to chocolate brown with some greys and sometimes even some dull reds.
The next step was to cut a slot in a piece of horn, heat the tang and push it down. The horn bubbles and melts and seats itself to a very good fit. The wood was drilled full depth of the tang and slightly undersize and then this was burnt on also. The horn and the wood were then glued together and then shaped.
I am going for a long handle on this seax, but the real battle is to make the handle fit the hand. The tang is really wide on this knife and so the handle top to bottom must be wide also, leaving a little wood above and below the tang, it became evident that it would have to be quite slim or you simply would not be able to get your hand around it, so in a way the handle shaped itself.
 Grip in progress
It has been important to this project that it is not too speculative; clearly there are places like handle shape where you have to speculate, but in others we are trying hard not to. It is so easy to go full tilt at the decoration but we are trying to stick with what we know as far as we can. We have decided to use the inlaid silver 'V' decoration of the Cumwhitton seax on part of the grip.
The next step was to inlay the silver wire into the horn and wood. This is done differently to when done in metal. First make a chisel in the usual way, but make it very fine. If this went into metal it would chip and snap, but into wood or horn and it will be fine. For the circles I used a piece of tube in a drill and spun it fast to basically burn a circular groove. The lines are then marked on and chiseled in around 2mm deep.
You then take pure silver strip and gently tap it down into the groove to seat it home, file off and burnish.
We decided to use a silver wire motif that was found on the Cumwhitton seax and it is a series of 'V' wires with circles on the ends and so circular grooves were formed and the 'V's were then chiseled in. To make it neat, I made a jig to bend the wires around and I suspect this is how it was done originally, so then each wire set would fit each groove set.
 Wire bending jig

Bent wire form
After a couple of abortive tests, I got the knack of laying the wires in and how to make the grooves the right size. Because the wire is so soft, it will not 'find its own place' like a steel wire would, so the groove does need to be exact.
The wire inlay is subtle, perhaps too subtle, but looking at 'The Seax of Charlemagne', subtle low key handles were OK too. I will soak the handle in linseed oil and this will darken it as well, so the contrast with the silver will increase.
 Grip in progress
There is very little evidence indeed as to how these were worn or carried and so I have made this harness really from conjecture. We know they used these distributor rings, but in many cases not really how and so I have made a system that works.
The handle and sheath are speculative and have taken elements from various contemporary finds to create a piece 'that could have been' . The handle is horn and box wood and inlaid with silver.
The sheath is leather with brass and copper decorative plates and rivets, the leather decoration is geometric and based on themes from the blade.
Overall length is 82cm/32" and weight is 1136g/2lb8oz
The weight may seem high, but the blade was supplied just a few grams over the museum weight, before the fuller was cut in, so I expect it to be very nearly identical to the original.
I hope you like it.
And that Ladies and Gentleman, is that.
Tod


 With thanks to
Ryan Renfro for arranging the British Museum visit
The British Museum for allowing us to examine, measure and handle the piece
Owen Bush for making the raw blade www.owenbush.co.uk
And of course Jeremy, my client for placing the order and giving me proper time and free reign to complete it.
And of course, Beagnoth, for commissioning the original knife 1100 years ago
Also in Tod's Blog

Netflix 'The Witcher' Series 3, NOW OUT Thursday 29th June 2023
FINAL FANTASY XVI - TOD MAKES INVICTUS SWORD
The Final Fantasy series XVI, Clive Rosfield's Sword, INVICTUS made by Tods Workshop/Tod Todeschini. Its in the Tower of London from 22nd !